
How to Implement Server-side Tracking with Google Tag Manager
With the increasing adoption of browser-based ad blockers, marketing and website/ecommerce management teams are losing considerable amounts of web analytics data. If you’re already aware of the option of implementing server-side tracking to recoup that data, then this is the right article for you.
Overview of Server-side Tracking
With the increasing adoption of browser-based ad blockers, marketing and website/ecommerce management teams are losing considerable amounts of web analytics data. If you’re already aware of the option of implementing server-side tracking to recoup that data, then this is the right article for you. If you are new to the concept, you can get the full background here.
Google Tag Manager (hereafter referred to as “GTM”) recently launched a server-side solution, which provides tagging capabilities for Universal Analytics, GA4, Google Ads, Floodlight, and generic HTTP requests. The purpose of implementing server-side tagging is to circumvent the aforementioned ad blockers in order to attain more replete and more accurate analytics data.
List of Requirements
To correctly install, configure, and implement a server-side GTM container, you will need the following:
Google Account to access all required platforms. Ideally this would be a centrally managed/owned account to prevent future access issues.
Google Tag Manager Server-side Container configured with tags and logic.
Google Cloud Platform account with billing configured.
Provisioned Google Cloud application.
Custom subdomain for each domain implementation.
Duplicated Gtag and Google Tag Manager tags with subdomain transport url option populated.
Installation
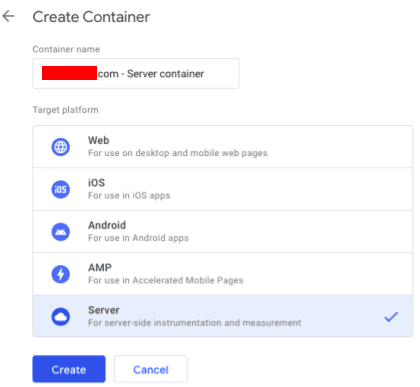
Step 1 - GTM Server-side Container
In the Google Tag Manager dashboard, create a new Server-side container for both your domain. Note that Individual endpoints are required for each container to circumvent Ad Blockers by using the same-origin.
Step 2 - Machine Provisioning
After creating the containers, a prompt for provisioning will appear. For ease of use, select the Automatically provision tagging server option and follow the guided steps to complete the setup.
Triggering provisioning will create a new App Engine project on Google Cloud. Note that this step requires a Google billing account to be set up on the user creating the container. It’s important that you know that provisioning of the GCP tagging server may take up to 24 hours, so be sure to include that in your setup timelines.
Step 3 - Initial Testing
Once the App Engine provisioning has been completed and the server-side container is running, a default URL will be provided. Early stage testing can be completed here to ensure the triggers are firing as expected. This can be a lightweight experiment including one Universal Analytics pageview and one GA4 pageview.
Testing requires live data to be sent to the containers.
Step 4 - Custom Domain
For this step you will need to work with your domain DNS provider (or networking team for larger organizations). This is a critical step, as it will allow your website to effectively spoof a first-party script call, thus not triggering (most) ad blockers’ flags.
You’ll need to create a new custom subdomain such as analytics.yourdomain.com, which will actually point to the App Engine machine.
The steps to complete this are listed below:
Create the subdomain through your domain provider
In Google Search Console, verify ownership of the domain using the TXT record method
Get the A and AAAA records from Google Cloud Engine:
Go to the project hosting the server-side container on App Engine
Navigate to Settings > Custom Domains and select ADD A CUSTOM DOMAIN
Select the verified domain, include only the subdomain in step 2, then save the provided records
Update the subdomain’s A and AAAA DNS records with the values provided by Google Cloud Engine
Configuration
Universal Analytics
Now all you’ll need to do is duplicate each function call to gtag, and include the option Transport URL with the subdomain you created and verified.
E.g. Pageview
ga('send', 'pageview', {
'transport_url': 'https://analytics.yourdomain.com'
});
E.g. Event
ga('send', event, {
hitType: 'event',
eventCategory: 'Video',
eventAction: 'play',
eventLabel: intro.mp4',
transport_url: 'https://analytics.yourdomain.com'
});
Google Tag Manager Server-Side
The following steps are required to enable proper tagging and tracking:
Enable the Universal Analytics and Google Analytics 4 clients
Include Tags for Universal Analytics and Google Analytics 4
Include Triggers to fire on the correct Client Name.
This is how server-side determines what type of request was given and processes the data in a way that can be handled through configured tags.
An example is the GA4 client; this can be converted into triggers to fire the correct tags.
Final Notes
As mentioned above and as of the writing of this article, only Google tags specifically are supported. However, generic HTTP requests are an option for expanding outside of Google Platforms, but the degree to which they will function will be dependent on the other sources capabilities.
While server-side GTM is a relatively new (beta) tool, it appears to be well-supported and we anticipate increased functionality over time. The implementation is somewhat heavy on the technical components, so if you’re in need of assistance feel free to reach out!
Overview of Server-side Tracking
With the increasing adoption of browser-based ad blockers, marketing and website/ecommerce management teams are losing considerable amounts of web analytics data. If you’re already aware of the option of implementing server-side tracking to recoup that data, then this is the right article for you. If you are new to the concept, you can get the full background here.
Google Tag Manager (hereafter referred to as “GTM”) recently launched a server-side solution, which provides tagging capabilities for Universal Analytics, GA4, Google Ads, Floodlight, and generic HTTP requests. The purpose of implementing server-side tagging is to circumvent the aforementioned ad blockers in order to attain more replete and more accurate analytics data.
List of Requirements
To correctly install, configure, and implement a server-side GTM container, you will need the following:
Google Account to access all required platforms. Ideally this would be a centrally managed/owned account to prevent future access issues.
Google Tag Manager Server-side Container configured with tags and logic.
Google Cloud Platform account with billing configured.
Provisioned Google Cloud application.
Custom subdomain for each domain implementation.
Duplicated Gtag and Google Tag Manager tags with subdomain transport url option populated.
Installation
Step 1 - GTM Server-side Container
In the Google Tag Manager dashboard, create a new Server-side container for both your domain. Note that Individual endpoints are required for each container to circumvent Ad Blockers by using the same-origin.
Step 2 - Machine Provisioning
After creating the containers, a prompt for provisioning will appear. For ease of use, select the Automatically provision tagging server option and follow the guided steps to complete the setup.
Triggering provisioning will create a new App Engine project on Google Cloud. Note that this step requires a Google billing account to be set up on the user creating the container. It’s important that you know that provisioning of the GCP tagging server may take up to 24 hours, so be sure to include that in your setup timelines.
Step 3 - Initial Testing
Once the App Engine provisioning has been completed and the server-side container is running, a default URL will be provided. Early stage testing can be completed here to ensure the triggers are firing as expected. This can be a lightweight experiment including one Universal Analytics pageview and one GA4 pageview.
Testing requires live data to be sent to the containers.
Step 4 - Custom Domain
For this step you will need to work with your domain DNS provider (or networking team for larger organizations). This is a critical step, as it will allow your website to effectively spoof a first-party script call, thus not triggering (most) ad blockers’ flags.
You’ll need to create a new custom subdomain such as analytics.yourdomain.com, which will actually point to the App Engine machine.
The steps to complete this are listed below:
Create the subdomain through your domain provider
In Google Search Console, verify ownership of the domain using the TXT record method
Get the A and AAAA records from Google Cloud Engine:
Go to the project hosting the server-side container on App Engine
Navigate to Settings > Custom Domains and select ADD A CUSTOM DOMAIN
Select the verified domain, include only the subdomain in step 2, then save the provided records
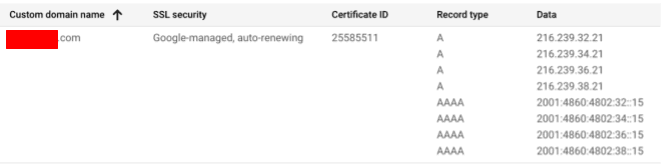
Update the subdomain’s A and AAAA DNS records with the values provided by Google Cloud Engine
Configuration
Universal Analytics
Now all you’ll need to do is duplicate each function call to gtag, and include the option Transport URL with the subdomain you created and verified.
E.g. Pageview
ga('send', 'pageview', {
'transport_url': 'https://analytics.yourdomain.com'
});
E.g. Event
ga('send', event, {
hitType: 'event',
eventCategory: 'Video',
eventAction: 'play',
eventLabel: intro.mp4',
transport_url: 'https://analytics.yourdomain.com'
});
Google Tag Manager Server-Side
The following steps are required to enable proper tagging and tracking:
Enable the Universal Analytics and Google Analytics 4 clients
Include Tags for Universal Analytics and Google Analytics 4
Include Triggers to fire on the correct Client Name.
This is how server-side determines what type of request was given and processes the data in a way that can be handled through configured tags.
An example is the GA4 client; this can be converted into triggers to fire the correct tags.
Final Notes
As mentioned above and as of the writing of this article, only Google tags specifically are supported. However, generic HTTP requests are an option for expanding outside of Google Platforms, but the degree to which they will function will be dependent on the other sources capabilities.
While server-side GTM is a relatively new (beta) tool, it appears to be well-supported and we anticipate increased functionality over time. The implementation is somewhat heavy on the technical components, so if you’re in need of assistance feel free to reach out!